



What to know before choosing screen printing
Screen printing transfers opaque inks onto fabric through a screen prepared for each colour in the design. It is particularly suitable for medium to large orders, designs with few colours and garments that need to withstand numerous washes. In this guide, we look at how it works, which fabrics it can be used on and when it is a good choice compared with other techniques.
To move from the guide to the catalogue, start with the personalised T-shirts page: from there you can choose men’s, women’s or children’s styles and configure your quote online.
If you are still choosing the most suitable method, consult the comparison of T-shirt printing techniques. This page takes a closer look at the process, advantages and limitations of screen printing alone.
When is screen printing T-shirts a good choice?
Direct digital printing can only be carried out on clothing made from 100% cotton (organic or otherwise) or on cotton blends in which cotton is the predominant material.
Screen printing, on the other hand, can be used on many natural or synthetic fabrics. For example, if you need screen-printed shirts for a sporting event, you would certainly choose polyester. And screen printing is ideal for this fabric made from plastic fibres too!
Screen printing uses thicker inks than direct digital printing and is less expensive (unless you choose a design with too many different colours).
A screen is used for each colour when preparing a screen print. The technique is therefore suitable for personalising many T-shirts in a series with the same design.
For the same reason, it can be somewhat costly and therefore unsuitable for designs with many colours: in our case the limit is 6.
Despite this, it is also perfect for elaborate designs (as you can see in our examples by clicking here: https://www.burger-print.nl/en/faq/printing-techniques).
Let’s take an even closer look at this technique…
How does screen printing on T-shirts work?
You are probably wondering how a T-shirt is screen printed. It is not very easy to explain in writing, but we will do our best.
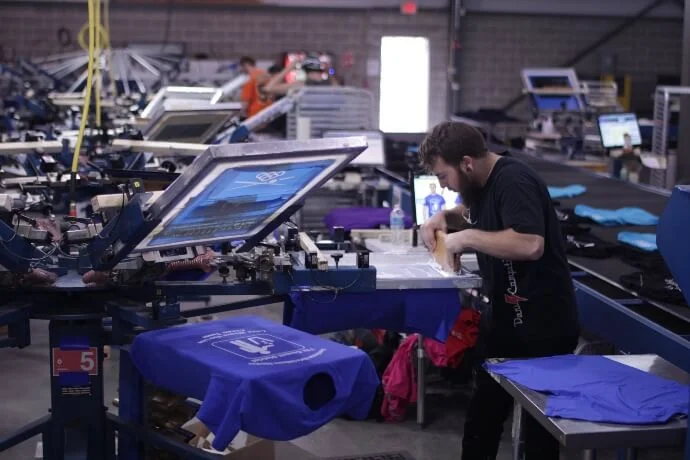
A screen (stencil) is used for each colour to be printed. The screens must be aligned and printed on test sheets to ensure that all the colours line up correctly.
The inks are then pushed through the screens onto the clothing, one colour at a time. Finally, each item passes through a large dryer, a kind of oven, so that the inks set and become resistant to both hand and machine washing.
Screen printing has very few limitations when it comes to printing surfaces. Here are some examples of what we can screen print:
- T-shirts in any fabric
- Affordable personalised shopping bags in any material
- Bags
- Jackets
- Mouse mats
- Caps
- Polo shirts
And much more!
We generally do not print on jumpers, because the finished fabric is very airy and less compact than cotton, polyester, viscose, etc. The final result would therefore not be satisfactory.
What is the final effect of screen-printed shirts?
Unlike DTG printing, screen printing is done entirely by hand. This technique is a bargain for designs with few colours (in our case a maximum of 6) and/or for large orders involving the same identical design printed on multiple items.
But how can you recognise a screen-printed T-shirt?
Simply by running your hand over the print. If you touch the ink with the palm of your hand, you will feel that it is raised and rather soft (almost rubbery).
The result is therefore very pleasing both to the eye and to the touch: you will be extremely satisfied with your shirts screen printed online at Burger Print!
Can’t wait to order your T-shirts?
How to order personalised T-shirts online (with screen printing)
Creating affordable personalised T-shirts on our website is really very simple.
Just follow these simple steps:
- Open the personalised T-shirt catalogue using the link at the beginning of the guide.
- Choose whether to print men’s, women’s or children’s T-shirts.
- Browse the catalogue and choose your favourite style, or select the filters (for example material, neckline, fit, etc.) listed on the right to find your preferred style as quickly as possible.
- Once you have selected your desired base T-shirt, click on it, check that it has all the necessary features and then click on “Calculate quote”. Alternatively, you can click on “Buy sample” to see and feel the T-shirt before printing it (you will only pay for the sample: shipping is always free!).
- Once you have clicked on “Calculate quote”, choose the number of shirts you want, specifying your desired sizes and colour (simply enter the number of T-shirts to purchase in the relevant boxes).
- Choose one or more of the following options, also specifying the type of printing you want (or embroidery): front print, back print, right sleeve print, left sleeve print.
- Select the packaging type: loose goods (free) or individually folded and bagged (+0,36€).
- Now select a delivery date from those offered (some dates may carry a surcharge).
- Once you have completed all the fields, click on “Add to cart”.
- Proceed to enter your billing details and make payment (which you can also make partly online and partly on delivery).
- Finally, it is time to upload the print file!
Read the instructions for creating and uploading the file correctly: https://www.burger-print.nl/en/faq/file-preparation-screen-printing
And that’s it: your order is ready for delivery! Create your personalised clothing on Burger Print now and don’t forget to use the 5% voucher on your first purchase!